Tuesday, February 2, 2010

Free Baby Shower Invites

You should be able to save the photo and then add text in Power Point. To add the photo as a background on Power Point go to Format->Slide Background ->Fill -> Picture ->Choose Picture. Then to add text choose Insert -> Text Box.
I get all my fonts from here http://www.kevinandamanda.com/fonts/

They have the cutest fonts! Let me know if you need help with anything.

Thursday, January 7, 2010

The Beast

I'm bored so I need to keep busy, I bought this at Savers a couple days ago. And I'm going to refinish it. Hopefully I may turn this beast into a beauty

Am I crazy? Yes!
The reasons:
1. I have to repaint
2. Get new cushions
3. Re-upholster
4. And sew, I don't know how to sew.
P.S. How come old chairs/couches always look like someone pissed themselves in them or died in them. It's very creepy.

So you may not see the finished product for a while, but that's okay because I will finish this, it just may take me longer than someone who knows what they are doing.

A new years resolution perhaps?


Wednesday, January 6, 2010

Valentine Topiary

Valentines already??????
I've been wanting to keep my hands busy because idle hands are not good hands. So I decided to make something that would be cheap, which is a tissue paper topiary!
Isn't it pretty!


Supplies I used-
Styrofoam Ball (I used a large plastic Christmas ornament that I got on clearance at Walmart, $1.25 for a pack of 6! A Styrofoam ball is $2.50 at Walmart.)
Wood dowel (stick) - Painted desired color
Wood plaque ( Michael's $0.62), or clay pot- Painted desired color
Tissue paper - ( I used 2 sheets of each color white, pink, and magenta, packs of individual colors are at Zurchers for $0.80) 3 sheets of each color to be safe. Total 8-9 Sheets, but you won't use them all depending on how you cut.
Mod Podge or Elmers glue
Small paint brush to paint glue
Pencil
Hot glue gun
Styrofoam block

This cost me around $4.00 to make, not bad!

Step 1: Cut wood dowel to desired length, no need to sand cut edge because it will just go into the ball. Paint dowel, wood plaque or clay pot.

Step 2: Tissue Paper Roses
I counted the hard way after I was done so I don't know if it's correct but I did 13 white, 13 pink, and 11 magenta. Maybe do 15 of each color to be safe. I started with 10 of each color and it was a pain to make more as I was already into the project.

Cut 2 - 2 1/2" wide x 18" long strips. I just cut the direction of the tissue paper fold, so it's the shorter length. I didn't measure exactly.....

Fold the the strip in half so it's half as wide. Take the pencil and roll the edge in, this just makes the paper easier to work with. I didn't fold in half exactly I folded left 1/4" out as a "tail" for my glue.

Take the pencil out and keep rolling the edge in to start shaping. Glue the bottom to hold the shape together. Your hands may get sticky from the glue just try to not get it too sticky or it will stick to the paper you are forming.


This is what it will start to look like as you start forming it. Every time you roll you will need to apply glue at the bottom so it will stay together, a little bit of the paper will be pinched together due to the glue and shaping, it's easier to hold that way too.

This is a bad photo but this is what the bottom looks like when it's finished, it's more rounded but if there's excess sticking out that's okay just smash it up.


This is how the top looks


Step 3: Glue Roses to Ball
Attach wood dowel (stick) to ball. Since I used an ornament I had to make sure the dowel would fit in the hole, I just hot glued the tip and stuck it in the hole. If you are using a Styrofoam ball you should probably glue it in so it will stay.

After it's put together set it in a Styrofoam block. Now you can glue the roses on the ball. Put the glue on the bottom of the rose, you don't need much, be careful since this is paper the glue gets really hot and drips off the paper. I started at the top of the ball and worked my way around. If you are using different colored roses try to separate them so you don't have the same colors bunched next to each other. When you glue them together it's okay to fold the edges up so they are smashed a little bit so you can get them really close together so you don't see any of the ball.


Keep working around ball, and try to put them close to each other.

Step 4: Glue Topiary to Plaque
I used hot glue and it came off, so I need to drill a hole in so it will stay. Or you could get a heavy duty glue.
If you are using a clay pot I think it would be cute to paint the top of the styrofoam and then cover it with glitter instead of using moss or something.
Done!

Photo Blocks


I made these for some peeps, just printed the photos on normal printer paper and the antiqued the edges with ink and mod podged them onto the painted blocks. I noticed that the ink from the photos smeared so it would probably be better to use photo paper.

Sunday, July 12, 2009

It's A Shower

Yesterday I threw a shower for my soon to be sister in law Mollie, she's marrying Alex's brother Kasey. It was lots of fun and lots of work, but it was worth it. I'm so excited for her to join our family. I decided this is something that's blog worthy, and I'm going to show off what I did, because that's what blogging is all about........showing off, isn't it? :)
I love kettle corn, I got the idea to make it from getting it on the 4th of July, it's really easy to make too. I made the cones out of parchment paper and the holder out of a shirt box.
Gotta love the Martha Stewart flower poms. That's a picture of Kasey and Molly, it was kind of ironic that it was "orange and red".
Got the idea from Bakerella.blogspot.com, she makes cupcake pops but I didn't like the way her's tasted. I made these instead which are just normal cupcakes and I used a small cupcake pan, put them in the freezer for 10 min., dipped the bottoms in milk chocolate put them on a plate top down, put a lollipop stick in them, put them in the fridge for 10 min., dipped them in colored white chocolate, put sprinkles and m&m's on top, left them in the fridge, and wrapped them after they cooled.
I got this box at Target and made the label that says "Advice" on scrapblog.com, then I printed on a mailing label. The advice card I printed on cardstock and stamped on the orange design.
I made the waffle bowles and they were really easy too, they sell waffle cone makers at Target and it comes with the recipe. I shaped the bowl from a sundae bowl. Alex's mom made the delicious sherbet ice cream.

Thursday, October 23, 2008

Super Tuesday

Last Tuesday my ward had their annual Super Tuesday craft night. It was a lot of fun. I'm in the same ward as my mother in law so she was there and my sister in law and mom came and made some stuff too. I made liquid soap bottles and a cute magnet board with vinyl lettering.

Here's a picture of me making the bottles.


My mom helping me tie the bows, I hate tying bows they take me forever.


Here's a picture of the soap bottle up close so you can see the cute saying that's inside.

I thought these hand soaps would be a great idea for Christmas presents for friends or neighbors. I can't tell you how it's made because I just put the "saying" insert inside the soap bottle and poured soap inside and tied a bow around it. But I found another blog that tells how to make it. Here is the link Vacuuming in high heels & pearls. The lady who brought the soap bottles said she bought them at Industrial Supply, she said all they had was foam soap bottles. I thought they turned out cute. *If you use the foam bottles you can fill them with any liquid soap but just water the soap down a lot or the soap won't foam.


Making the magnet boards. These were so easy to make, just paint, sand around the edges, measure the metal boards to be even with each other, then glue them on with liquid nails, the drill holes in each corner of the the metal and then hammer tacks into the sides.


The finished look, I want to add a metal handle like on my trick or treat basket to the top and tie it off with ribbon. I think that would look really cute.

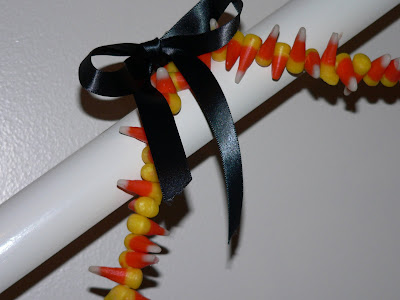
Candy Corn Garland


I stole this idea from from this cute blog Bienvenue this was her way cute garland below